
在Android系统中,发一个状态栏通知还是很方便的。下面我们就来看一下,怎么发送状态栏通知,状态栏通知又有哪些参数可以设置?
首先,发送一个状态栏通知必须用到两个类: NotificationManager 、 Notification。
NotificationManager : 是状态栏通知的管理类,负责发通知、清楚通知等。
NotificationManager 是一个系统Service,必须通过 getSystemService()方法来获取。
NotificationManager nm = (NotificationManager) getSystemService(NOTIFICATION_SERVICE);
Notification:是具体的状态栏通知对象,可以设置icon、文字、提示声音、振动等等参数。
下面是设置一个通知需要的基本参数:
An icon (通知的图标) A title and expanded message (通知的标题和内容) A PendingIntent (点击通知执行页面跳转)
可选的设置:
A ticker-text message (状态栏顶部提示消息) An alert sound (提示音) A vibrate setting (振动) A flashing LED setting (灯光) 等等
一、创建Notification
通过NotificationManager 的 notify(int, Notification) 方法来启动Notification。
第一个参数唯一的标识该Notification,第二个参数就是Notification对象。
二、更新Notification
调用Notification的 setLatestEventInfo方法来更新内容,然后再调用NotificationManager的notify()方法即可。(具体可以看下面的实例)
三、删除Notification
通过NotificationManager 的cancel(int)方法,来清除某个通知。其中参数就是Notification的唯一标识ID。
当然也可以通过 cancelAll() 来清除状态栏所有的通知。
四、Notification设置(振动、铃声等)
1. 基本设置:
//新建状态栏通知 baseNF = new Notification(); //设置通知在状态栏显示的图标 baseNF.icon = R.drawable.icon; //通知时在状态栏显示的内容 baseNF.tickerText = "You clicked BaseNF!"; //通知的默认参数 DEFAULT_SOUND, DEFAULT_VIBRATE, DEFAULT_LIGHTS. //如果要全部采用默认值, 用 DEFAULT_ALL. //此处采用默认声音 baseNF.defaults = Notification.DEFAULT_SOUND; //第二个参数 :下拉状态栏时显示的消息标题 expanded message title //第三个参数:下拉状态栏时显示的消息内容 expanded message text //第四个参数:点击该通知时执行页面跳转 baseNF.setLatestEventInfo(Lesson_10.this, "Title01", "Content01", pd); //发出状态栏通知 //The first parameter is the unique ID for the Notification // and the second is the Notification object. nm.notify(Notification_ID_BASE, baseNF);
配一张图作说明: 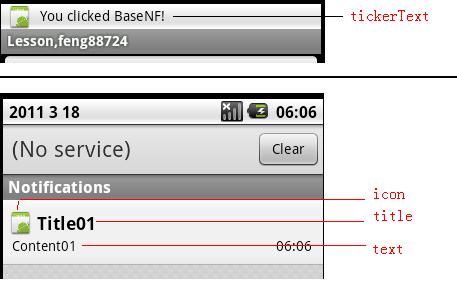
2. 添加声音
如果要采用默认声音,只要使用default就可以了。
baseNF.defaults = Notification.DEFAULT_SOUND;
如果要使用自定义声音,那么就要用到sound了。如下: notification.sound = Uri.parse("file:///sdcard/notification/ringer.mp3");
上面这种方法,使用的是自己的铃声,如果想用系统自带的铃声,可以这样: notification.sound = Uri.withAppendedPath(Audio.Media.INTERNAL_CONTENT_URI, "6");
需要注意一点,如果default、sound同时出现,那么sound无效,会使用默认铃声。
默认情况下,通知的声音播放一遍就会结束。 如果你想让声音循环播放,需要为flags参数加上FLAG_INSISTENT。 这样声音会到用户响应才结束,比如下拉状态栏。
notification.flags |= notification.FLAG_INSISTENT;
3. 添加振动
如果是使用默认的振动方式,那么同样也是使用default。
notification.defaults |= Notification.DEFAULT_VIBRATE;
当然也可以自己定义振动形式,这边需要用到Long型数组。 long[] vibrate = {0,100,200,300};notification.vibrate = vibrate;
这边的Long型数组中,第一个参数是开始振动前等待的时间,第二个参数是第一次振动的时间,第三个参数是第二次振动的时间,以此类推,随便定义多长的数组。但是采用这种方法,没有办法做到重复振动。
同样,如果default、vibrate同时出现时,会采用默认形式。
另外还需要注意一点:使用振动器时需要权限,如下:
4. 闪光
使用默认的灯光,如下:
notification.defaults |= Notification.DEFAULT_LIGHTS;
自定义:
notification.ledARGB = 0xff00ff00;notification.ledOnMS = 300;notification.ledOffMS = 1000;notification.flags |= Notification.FLAG_SHOW_LIGHTS;
其中ledARGB 表示灯光颜色、 ledOnMS 亮持续时间、ledOffMS 暗的时间。
注意:这边的颜色跟设备有关,不是所有的颜色都可以,要看具体设备。
5. 其他有用的设置:
flags:
Notification.FLAG_INSISTENT; //让声音、振动无限循环,直到用户响应
Notification.FLAG_AUTO_CANCEL; //通知被点击后,自动消失
Notification.FLAG_NO_CLEAR; //点击'Clear'时,不清楚该通知(QQ的通知无法清除,就是用的这个)
下面附上我做的例子,供大家参考。 里面包括创建通知、更新通知、清除通知、设置自定义铃声、自定义振动、自定义通知视图等。

附上代码:
主类:
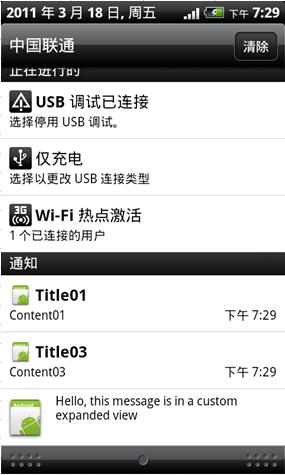
package com.yfz;import android.app.Activity;import android.app.Notification;import android.app.NotificationManager;import android.app.PendingIntent;import android.content.Intent;import android.net.Uri;import android.os.Bundle;import android.provider.MediaStore.Audio;import android.util.Log;import android.view.View;import android.view.View.OnClickListener;import android.widget.Button;import android.widget.RemoteViews;import android.widget.SeekBar;import android.widget.TextView;/** * Notification * @author Administrator * */public class Lesson_10 extends Activity { //BaseNotification private Button bt01; //UpdateBaseNotification private Button bt02; //ClearBaseNotification private Button bt03; //MediaNotification private Button bt04; //ClearMediaNotification private Button bt05; //ClearALL private Button bt06; //CustomNotification private Button bt07; //通知管理器 private NotificationManager nm; //通知显示内容 private PendingIntent pd; @Override public void onCreate(Bundle savedInstanceState) { super.onCreate(savedInstanceState); /*加载页面*/ setContentView(R.layout.lesson10); init(); } private void init() { bt01 = (Button)findViewById(R.id.le10bt01); bt02 = (Button)findViewById(R.id.le10bt02); bt03 = (Button)findViewById(R.id.le10bt03); bt04 = (Button)findViewById(R.id.le10bt04); bt05 = (Button)findViewById(R.id.le10bt05); bt06 = (Button)findViewById(R.id.le10bt06); bt07 = (Button)findViewById(R.id.le10bt07); bt01.setOnClickListener(onclick); bt02.setOnClickListener(onclick); bt03.setOnClickListener(onclick); bt04.setOnClickListener(onclick); bt05.setOnClickListener(onclick); bt06.setOnClickListener(onclick); bt07.setOnClickListener(onclick); nm = (NotificationManager) getSystemService(NOTIFICATION_SERVICE); Intent intent = new Intent(this,Lesson_10.class); pd = PendingIntent.getActivity(Lesson_10.this, 0, intent, 0); } OnClickListener onclick = new OnClickListener() { //BASE Notification ID private int Notification_ID_BASE = 110; private Notification baseNF; //Notification ID private int Notification_ID_MEDIA = 119; private Notification mediaNF; @Override public void onClick(View v) { switch(v.getId()) { case R.id.le10bt01: //新建状态栏通知 baseNF = new Notification(); //设置通知在状态栏显示的图标 baseNF.icon = R.drawable.icon; //通知时在状态栏显示的内容 baseNF.tickerText = "You clicked BaseNF!"; //通知的默认参数 DEFAULT_SOUND, DEFAULT_VIBRATE, DEFAULT_LIGHTS. //如果要全部采用默认值, 用 DEFAULT_ALL. //此处采用默认声音 baseNF.defaults |= Notification.DEFAULT_SOUND; baseNF.defaults |= Notification.DEFAULT_VIBRATE; baseNF.defaults |= Notification.DEFAULT_LIGHTS; //让声音、振动无限循环,直到用户响应 baseNF.flags |= Notification.FLAG_INSISTENT; //通知被点击后,自动消失 baseNF.flags |= Notification.FLAG_AUTO_CANCEL; //点击'Clear'时,不清楚该通知(QQ的通知无法清除,就是用的这个) baseNF.flags |= Notification.FLAG_NO_CLEAR; //第二个参数 :下拉状态栏时显示的消息标题 expanded message title //第三个参数:下拉状态栏时显示的消息内容 expanded message text //第四个参数:点击该通知时执行页面跳转 baseNF.setLatestEventInfo(Lesson_10.this, "Title01", "Content01", pd); //发出状态栏通知 //The first parameter is the unique ID for the Notification // and the second is the Notification object. nm.notify(Notification_ID_BASE, baseNF); break; case R.id.le10bt02: //更新通知 //比如状态栏提示有一条新短信,还没来得及查看,又来一条新短信的提示。 //此时采用更新原来通知的方式比较。 //(再重新发一个通知也可以,但是这样会造成通知的混乱,而且显示多个通知给用户,对用户也不友好) baseNF.setLatestEventInfo(Lesson_10.this, "Title02", "Content02", pd); nm.notify(Notification_ID_BASE, baseNF); break; case R.id.le10bt03: //清除 baseNF nm.cancel(Notification_ID_BASE); break; case R.id.le10bt04: mediaNF = new Notification(); mediaNF.icon = R.drawable.icon; mediaNF.tickerText = "You clicked MediaNF!"; //自定义声音 mediaNF.sound = Uri.withAppendedPath(Audio.Media.INTERNAL_CONTENT_URI, "6"); //通知时发出的振动 //第一个参数: 振动前等待的时间 //第二个参数: 第一次振动的时长、以此类推 long[] vir = {0,100,200,300}; mediaNF.vibrate = vir; mediaNF.setLatestEventInfo(Lesson_10.this, "Title03", "Content03", pd); nm.notify(Notification_ID_MEDIA, mediaNF); break; case R.id.le10bt05: //清除 mediaNF nm.cancel(Notification_ID_MEDIA); break; case R.id.le10bt06: nm.cancelAll(); break; case R.id.le10bt07: //自定义下拉视图,比如下载软件时,显示的进度条。 Notification notification = new Notification(); notification.icon = R.drawable.icon; notification.tickerText = "Custom!"; RemoteViews contentView = new RemoteViews(getPackageName(), R.layout.custom); contentView.setImageViewResource(R.id.image, R.drawable.icon); contentView.setTextViewText(R.id.text, "Hello, this message is in a custom expanded view"); notification.contentView = contentView; //使用自定义下拉视图时,不需要再调用setLatestEventInfo()方法 //但是必须定义 contentIntent notification.contentIntent = pd; nm.notify(3, notification); break; } } }; }
主页面:
自定义视图页面:
就讲这么多。